In Animal Hospital (a Roblox horror game), it's not just the anomaly disguised as a pet at the window that will kill you, but also a group of Animal Hospital monsters roaming the clinic hallways. This page is a complete guide to these roaming monsters: from the common Bed Monster and Skinwalker to the surgical tentacles found only in the operating room, we break down their identification traits, proper countermeasures, and Sanity penalties.
Whether you are a newcomer on your first night or a veteran looking to slow down your Sanity drain, you can use this page as a cheat sheet to keep by your monitor—recognize every type of enemy, remember their weaknesses and taboos, and you'll be able to survive a few more Shifts.
Roaming Monsters vs. Window Anomaly: Distinguishing the Two Types of Threats
In Animal Hospital, threats are generally divided into two categories, and beginners often confuse them. Understanding the difference between these two types is the only way to know whether you should be holding the shutter, syrup, or the taser.
The first type is the anomaly that waits at the reception window disguised as a pet. They will line up for registration, and you need to screen them one by one. If you spot a flaw, drop the red shutter to reject them. These targets do not actively chase you; they are 'static' judgment tasks.
The second type, the focus of this page, does not line up or disguise itself; they roam directly through clinic hallways, patient rooms, and CCTV. The English community usually refers to these moving creatures as Animal Hospital enemies or monsters to distinguish them from window anomalies. They are 'dynamic' reaction tasks: after seeing a tell, you must take the correct action within seconds.
Even worse, these two types are not entirely separate—if you fail to screen them at the front desk and admit a disguised anomaly, it may reveal its true form inside the clinic, becoming the most unique of the roaming monsters: the Skinwalker. In other words, if you don't guard the window well, you'll have one more biting problem in the hallway.
Screening techniques for window anomalies are covered on a separate page; here we focus on 8 types of enemies/monsters that roam the clinic. Each has its own unique weakness and 'absolute taboos'—remembering them incorrectly is often worse than not remembering them at all.
Monster Quick-Reference Table: Everything You Need to Know at a Glance
If you're in a hurry, memorize this table first. It lists the nicknames/triggers, key tells, correct countermeasures, and Sanity penalties for all 8 Animal Hospital monsters—the speed at which your Sanity drops often depends on whether you can identify them within two seconds.
| Monster | Nickname / Trigger | Key Tells | Correct Countermeasure | Sanity Penalty |
|---|---|---|---|---|
| Bed Monster | Hiding under the bed marked with a red frame | Black figure, red eyes | Approach while holding Maple Syrup | Caught: -10; Held down: approx. -5 to -6 every 2 seconds |
| Stalker | "Hey Diva" | Elongated black rabbit, grinning with sharp teeth | Do not look directly, keep moving | When looked at: -10 |
| Mass of Eyes | "Don't Look Up" | Eyeballs and flesh on the ceiling, screen prompt DON'T LOOK UP | Keep the camera low, never look up | Looking up every 0.5 seconds: -2~-5 Sanity |
| Hiders | Wall Anomaly, in groups of 2-5 | Swarm of black figures, will steal Supplies | Run away immediately, they dissipate after 5-6 seconds | If attacked: -10 Sanity |
| Skinwalker | Generated from a patient that is an anomaly | Sharp teeth, wide-open mouth | Attacks from behind; spam E to break free; Taser/Gun are effective | Each bite: -6 Sanity |
| Head Banger | From Shift 2 onwards, bangs on the second reception window | Hollow eyes | Hand over coffee to calm it down | Dismiss without coffee: -20 Sanity |
| Surgery Tendril | Erupts in Operating Room 8, time limit approx. 45 seconds | Purple tentacles | Complete the surgery minigame; never use the Taser/Gun | Failure = patient death (mission failed) |
| Camera Figure | Appears on damaged CCTV feeds and zooms in | Black cat-like figure, red dotted eyes | Switch or turn off that camera feed before it finishes zooming | Jumpscare after zoom completes: -20 Sanity |
Monster Bestiary: Quick look at 8 enemy cards
Below are the 8 Animal Hospital monsters in card format, making it easy to compare while watching the CCTV. Each card lists its weakness, how to counter it, and the Sanity penalty; for more detailed mechanics, scroll down for in-depth analysis of each.

Bed Monster
- Black figure, red eyes
- Hospital bed marked with a red frame
Countermeasures:Approach with Maple Syrup to treat

Stalker
- Elongated black rabbit
- Smile full of sharp teeth
Countermeasures:Do not look directly, keep moving to bypass

Mass of Eyes
- Eyeballs and flesh on the ceiling
- Screen pops up DON'T LOOK UP
Countermeasures:Lower the camera, look ahead while walking, do not look up

Hiders
- Black figures in groups of 2-5
- Will steal your items
Countermeasures:Run away immediately, survive 5-6 seconds and they will dissipate

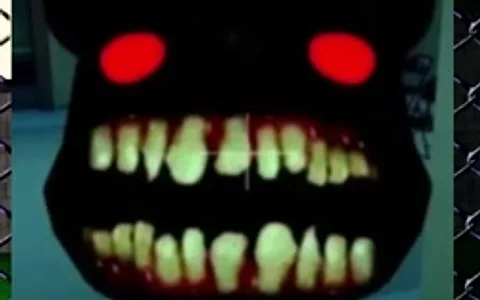
Skinwalker
- Fangs, wide-open mouth
- Comes from an admitted anomaly
Countermeasures:Attacks from behind; mash E if grabbed; Taser/Gun effective

Head Banger
- Hollow eyes
- Bangs on the 2nd registration window
Countermeasures:Hand over a cup of coffee to calm it down

Surgery Tendril
- Purple tentacle eruption
- Time limit approx. 45 seconds
Countermeasures:Complete the surgery mini-game; never use Taser/Gun
Camera Figure
- Black cat-like figure, red dotted eyes
- Appears on damaged CCTV and zooms in
Countermeasures:Switch/close the CCTV feed before it zooms in
Bed Monster in-depth analysis
The Bed Monster is one of the first Animal Hospital monsters beginners will encounter and the easiest to get caught by. It is a black figure with a pair of glowing red eyes that usually hides under a patient bed. The identification method is very direct: the bed it occupies will be marked by a red box—if you see a red box, it means there is something under that bed.
You cannot approach it empty-handed. The correct way is to hold Maple Syrup and walk toward the bed; syrup is its weakness, and you can deal with it once you get close. If you approach empty-handed or with the wrong item, it will grab you.
The Sanity penalty is split into two stages: you lose 10 Sanity the moment you are grabbed; if you fail to escape in time and are held down, you will continue to lose Sanity at a rate of about 5 to 6 points every 2 seconds. Therefore, once you make a mistake, your top priority is to break free as quickly as possible and don't let it drain your Sanity bit by bit.
Stalker / "Hey Diva"
The Stalker is nicknamed "Hey Diva" by the community because of how it greets you. It is an elongated, twisted black rabbit with a grinning face full of sharp teeth. It belongs to the typical category of Animal Hospital monsters where "it's fine if you don't look at it, but trouble starts when you make eye contact."
There are only two rules for dealing with it: do not stare directly at it, and keep moving—don't stand still. Move your gaze away from it and continue on your path, and it won't be able to do anything to you.
Once you look directly at it, you will lose 10 Sanity. The most common mistake for beginners is to "check where it is" out of curiosity or panic, which is exactly what it wants. Remember: sense its position with your peripheral vision and don't center your camera on it.
Mass of Eyes / "Don't Look Up"
The Mass of Eyes is also called "Don't Look Up" by players based on the on-screen prompt. It is a mass of eyeballs and flesh attached to the ceiling. When it appears, a prominent "DON'T LOOK UP" warning will pop up on your screen.
Its mechanics are similar to the Stalker, with the difference being that the threat comes from above. As long as you keep your camera aimed low and walk while looking straight ahead or at the floor, you can pass safely beneath it.
If you look up at it, your Sanity will drain at a rate of 2 to 5 points every 0.5 seconds—the longer you look up, the faster it drains. Seeing the warning and immediately looking down is the only correct solution; don't let curiosity get the better of you at this moment.
Hiders / Wall Anomaly
Hiders, also known as Wall Anomaly, usually appear in groups of 2 to 5 and look like clusters of black figures. The trouble with them isn't that they kill you instantly, but that they steal your items—and those items (maple syrup, coffee, etc.) are often your lifelines for dealing with other monsters.
Dealing with them is simple: Run. They will fade away on their own after about 5 to 6 seconds, so all you need to do is keep your distance and outlast those few seconds.
If you don't run and get attacked, you will lose 10 Sanity. For beginners, the indirect loss caused by having your items stolen is sometimes more fatal than those 10 points, so don't get greedy or try to fight when facing groups of Hiders; retreating is the best policy.
Skinwalker: The only target you should shoot
The Skinwalker is the most unique type of Animal Hospital monster in the entire mechanic because it doesn't spawn out of thin air—it transforms from an 'anomaly disguised as a patient' that you admitted. In other words, if you don't screen them well at the front desk and let an anomaly into the clinic as a real pet, it might reveal its true form inside: a wide-open mouth full of sharp teeth.
This is also one of the few targets that you can, and should, use weapons on. The correct way to fight is to attack from behind; if you get grabbed, mash E to break free. Both the taser and the gun are effective against the Skinwalker, which is the opposite of most other monsters.
It drains 6 Sanity for every bite. Since it stems from your mistake at the front desk, the best 'countermeasure' actually happens before admission—guard the reception window well and don't let disguised anomalies in, and you can reduce the appearance of Skinwalkers at the source.
The Skinwalker is the only roaming monster 'created' by player error. The stricter your front desk screening, the fewer times you'll need to draw your gun in the hallway. Remember to mash E when grabbed; don't just stand there and get bitten.
Head Banger: Offer it a coffee
The Head Banger has hollow eyes and starts appearing around Shift 2. Its signature behavior is repeatedly slamming into the second registration/reception window, making a thumping sound—once you hear that, you know who it is.
What it wants is quite 'down-to-earth'—coffee. Handing it a cup of coffee will calm it down and send it on its way, with zero Sanity loss.
But if you don't give it coffee and try to chase it away directly, the cost is very high: you will lose 20 Sanity in one go. This is one of the heaviest single penalties among all monsters, so beginners must keep coffee ready in advance; don't wait until it's banging on your door to scramble.
Surgery Tendril: Never shoot it
The Surgery Tendril appears in Operating Room 8: a burst of purple tentacles will suddenly erupt, giving you about 45 seconds to deal with it. Its danger doesn't lie in draining your Sanity, but in directly endangering the patient on the operating table.
The way to deal with it is to honestly complete the surgery mini-game. There is one iron rule here: absolutely do not use the taser or gun on it—weapons only work on the Skinwalker; firing at the Surgery Tendril will kill your patient on the spot, which is equivalent to failing the mission yourself.
If you fail to complete the process within 45 seconds, the result is also patient death. So don't panic when you encounter it, and definitely don't instinctively reach for your weapon; focusing on quickly completing the mini-game is the only correct solution.
The Surgery Tendril is the monster that most easily causes you to crash due to a 'reflexive draw of the gun.' Please strictly distinguish it from the Skinwalker: you can shoot the Skinwalker, but you must rely on the mini-game for the Surgery Tendril.
Camera Figure
The Camera Figure is a black, cat-like shape with red dotted eyes. It won't block you directly in the hallway, but will appear in the feed of a broken CCTV, constantly zooming in and approaching the lens.
The key to dealing with it is one word—fast: before it zooms in right to your face, quickly switch to another camera feed or just turn off that signal entirely.
If you let it finish zooming in, it will trigger a jumpscare, draining 20 Sanity at once. Keep your hands fast and your heart steady when checking CCTV; don't stare blankly at the same broken feed.
Summary of Weapon Rules and Sanity Penalties
To wrap up how to deal with all the previous monsters: when you can use weapons, when using them will ruin you, and exactly how much Sanity each monster drains. Please make sure to memorize this section, as using the wrong weapon and running out of Sanity are the two main ways beginners die.
In Animal Hospital, the scope of weapons (taser/gun) is extremely narrow: only the Skinwalker can and should be dealt with using weapons. Using weapons on any other monster is either ineffective or counterproductive—especially the Surgery Tendril, as firing at it will directly kill the patient on the operating table, effectively causing you to fail the mission.
- Identify the target first
Confirm if it is a Skinwalker: Open mouth, sharp teeth, and transformed from an anomaly you admitted. Yes → Proceed to Step 2; No → Skip to Step 3.
- Attack the Skinwalker
Both the taser and gun are effective; it is best to strike from behind. If it grabs you, mash E to break free.
- Other monsters: Put away your weapon
When facing a Surgery Tendril or any other monster, immediately holster your weapon and use their respective weaknesses/counters: Syrup for the Bed Monster, coffee for the Head Banger, look down for the Mass of Eyes, run for the Hiders, and switch cameras for the Stalker.
| Monster | Trigger Action | Sanity Change |
|---|---|---|
| Bed Monster | Being grabbed / Held down continuously | -10 / approx. -5~-6 per 2 seconds |
| Stalker | Looking directly at it | -10 |
| Mass of Eyes | Looking up at it | -2~-5 per 0.5 seconds |
| Hiders | Being attacked | -10 |
| Skinwalker | Each bite | -6 |
| Head Banger | Dismissing without coffee | -20 |
| Surgery Tendril | Surgery not completed within 45 seconds | Patient death (Mission failed) |
| Camera Figure | Jumpscare finished magnifying | -20 |
FAQ
Click to collapse / expand
What is the difference between roaming monsters and window anomalies?
Window anomalies are the monster disguised as a patient waiting in line at the reception window; you can reject them using the shutter. The Animal Hospital monsters discussed on this page actively roam the hallways, patient rooms, and CCTV; you need to react within seconds once you spot their tells. The two can interact: if you accidentally admit a disguised anomaly, it may turn into a roaming Skinwalker.
Which monsters are weapons effective against?
The taser and gun are only effective against Skinwalker. Using weapons on other monsters is useless or even harmful—especially against the Surgery Tendril; firing at it will kill the patient on the operating table, causing the mission to fail.
What should I do if there is a red box under the bed and red eyes appearing?
That is a Bed Monster. Hold Maple Syrup and approach the bed marked with the red box to deal with it. Do not approach empty-handed, or you will be grabbed: being grabbed costs 10 Sanity, and being held down drains an additional 5~6 Sanity every 2 seconds.
Why shouldn't I look directly at the Stalker ("Hey Diva")?
The Stalker is an elongated black rabbit; as long as you look directly at it, you will lose 10 Sanity. The correct approach is to avoid staring at it, use your peripheral vision to sense its position, and keep moving to bypass it. Panicking to "check where it is" is the most common mistake for beginners.
What does it mean when "DON'T LOOK UP" pops up on the screen?
This is a warning that a Mass of Eyes has appeared on the ceiling. Lower your camera, look forward while walking, and absolutely do not look up. Looking up will drain Sanity at a rate of 2~5 points every 0.5 seconds; the longer you look, the more you lose.
When does the Head Banger appear, and how do I deal with it?
It appears starting around Shift 2 and will bang on the second registration window. Give it a cup of coffee to appease and send it away. If you reject it without coffee, you will lose a full 20 Sanity, so please keep coffee stocked in advance.
How do I handle the red-eyed black cat that suddenly appears and magnifies on the CCTV?
That is a Camera Figure, which appears on damaged CCTV feeds. Immediately switch to another camera or turn off that feed before it finishes magnifying. Once it finishes, it triggers a jumpscare, costing 20 Sanity.
Where does the Skinwalker come from?
It turns into a monster from a disguised anomaly you accidentally admitted at the front desk; it does not spawn randomly. When dealing with it, attack from behind; if grabbed, mash E to break free. Both the taser and gun are effective, and each bite costs 6 Sanity. Managing your window screening well can reduce its appearance at the source.
What should I do if Hiders steal my items?
Hiders appear in groups of 2~5 and will steal your items. Don't engage them; just run, and they will dissipate on their own after about 5~6 seconds. Being attacked costs 10 Sanity. If key items like Maple Syrup or coffee are stolen, remember to restock them at the Supplies Shop.
Can I shoot the Surgery Tendril?
Absolutely not. It appears in Operating Room 8 with a time limit of about 45 seconds; what you need to do is complete the surgery minigame. Using a taser or gun on it will kill the patient immediately; failing to complete it within 45 seconds also results in the patient's death. It is the monster most likely to cause a failure due to a "reflexive trigger pull," so please strictly distinguish it from a Skinwalker.
What happens if Sanity drops to 0?
The core goal of the game is to keep your Sanity above 0 while surviving each Shift; hitting rock bottom means you can't hold on any longer, and the game ends. Keeping Maple Syrup and coffee stocked and using the correct countermeasure for each monster is key to slowing down Sanity loss. Please refer to the actual in-game experience for the specific effects after Sanity reaches zero.